Blog 4: 3D Printing An Artifact
- amuhsin23
- Aug 2, 2024
- 5 min read
Updated: Oct 17, 2024
WELCOME BACK TO MY BLOG!!!!!
This is going to be a very special blog as it is my last and final blog😔. But fret not this last blog will be the most unique out of all the blogs I have made so far. So seat back relax grab some pop corn and without further ado lettuce🥬 begin.
The TASK
We were tasked with designing and printing a print-in-place artifact with at least one moveable joint 🤖. The last criteria was that the artifact should not be able to be manufactured by subtractive manufacturing. But Ahmed, I hear you ask, "What is even subtractive manufacturing?" Well, dear reader, let me break it down for you 🧐.
Subtractive manufacturing is like carving a sculpture out of a block of marble—chipping away material until you get your desired shape. Think Michelangelo with his chisel, minus the Renaissance drama 🎨. On the other hand, 3D printing is like magic! 🪄 You start with nothing and add material layer by layer until your creation comes to life. It's kind of like building a snowman ⛄ from the ground up, minus the frostbite❄️. Or like making a sandwich 🥪 where you keep adding layers of deliciousness until you have the perfect bite! Imagine if Michelangelo had a 3D printer—David would’ve been done in no time, and he could’ve spent his afternoons making and eating pizza 🍕!
The Solution
Originally, I wanted to make a door hinge. However, as I talked to my friends and asked them what they were making, I realized almost all of their designs were the same hinge design 🤦♂️. So, I decided to scrap my idea. But don't worry, this story has a happy ending! I got inspired by the videos I watched, and below you can see what gave me that spark ✨.

You might be looking at this and wondering, "What is the spark?🧐" Well, dear reader, let me explain .
From the image above, I realized all I needed to do was sketch a 2D side profile of what I wanted to draw and then use the revolve function to make it 3D. It was like turning a flat pancake 🥞 into a perfectly round donut 🍩. Now, all that was left to do was to find an object that I could model and incorporate this design. And you would not be able to guess what I landed on.
THATS RIGHT BOYS while I was playing🎮 war thunder the tanks spoke to me and I understood that this was what I needed to model🚜💥. A revolving tank turret that would be able to go a full 360 degrees.
The Implementation

So, to begin, I imagined cutting a tank in half and sketching half of the side profile of this. After that, I realized that there was nothing stopping the turret from coming off the body 🚨. So, I put an extrusion near the bottom of the turret and a recess on the body. After completing the major design, I started to round the edges to prevent any sharp points, especially near the joints, as those would cause excessive damage to the print whenever it would turn. The image to the left is the final sketch.

After this I used the revolve function to make the tank body and turret 3D. For the barrels I just drew a circle and used the offset function to make another circle surround it. Then I extruded them by6 mm and connected it to my tank turret. Finally I used the hole function to make the barrels have a smooth bore. Tada a beautiful tank is created. Now all that's left is to print it. Below is the embedded file.
Now you might be asking why cant this be fabricated using subtractive technologies. well I will give you the same reason I put in my Practical 5 report.
My double-barrel gun turret with 360-degree rotation is impossible to make with subtractive methods – it's like trying to carve a sculpture out of butter with a chainsaw! 🧈🪓 Subtractive manufacturing removes material from a solid block, which can't handle complex internal features and hollow spaces. Think of it as trying to get the last bit of peanut butter out of the jar – super tricky! 🥜
Integrated moving parts? Forget about it! Achieving precise fits and clearances in one piece with subtractive methods is nearly impossible, like knitting a sweater from a single strand of yarn. 🧶
Additive manufacturing, however, builds layer by layer, perfect for complex designs with internal geometries and integrated moving parts. It's like 3D printing a masterpiece! 🖨️🎨 So, for my double-barrel gun turret, additive manufacturing is the way to go. 🔫✨
The Printing

Initially, I used the printers at W3 for my first two prints. While they were convenient, I quickly realized their quality didn’t match up to the fablab printers. My first print was a disappointment—it turned out too small🔬 due to a sizing error, as you can see from the image on the left. I wanted a mini tank, but not that mini!

After that failed attempt 😭 I started on my second print, it showed more promise but revealed some design flaws. I initially thought extruding the bottom of the turret first would improve its rotation. However, this caused the base to warp, resulting in an uneven and unsightly appearance. The base was not flush with the ground, as evident from the image. It looked like my tank had a bad hair day on one side! 💇♂️

or my final design, I made significant improvements. I increased the size and ensured the entire bottom was flush to the ground. These changes, combined with the superior quality of the fablab printers—bigger, better, stronger, and faster than the W3 printers—led to a successful print. This tank is a real beast 💪; it even makes my previous tank look like a baby👶 compared to it, as shown in the image on the left. Below you can see a time-lapse of the final turret being printed.
Despite its size, the turret spins smoothly with just a single finger 💫, as demonstrated in the video above. This indicates that the joint is well-designed and functions perfectly. It’s like a ballerina in a tank’s body—graceful yet powerful! 🩰
The Settings
For the setting you can see it below.
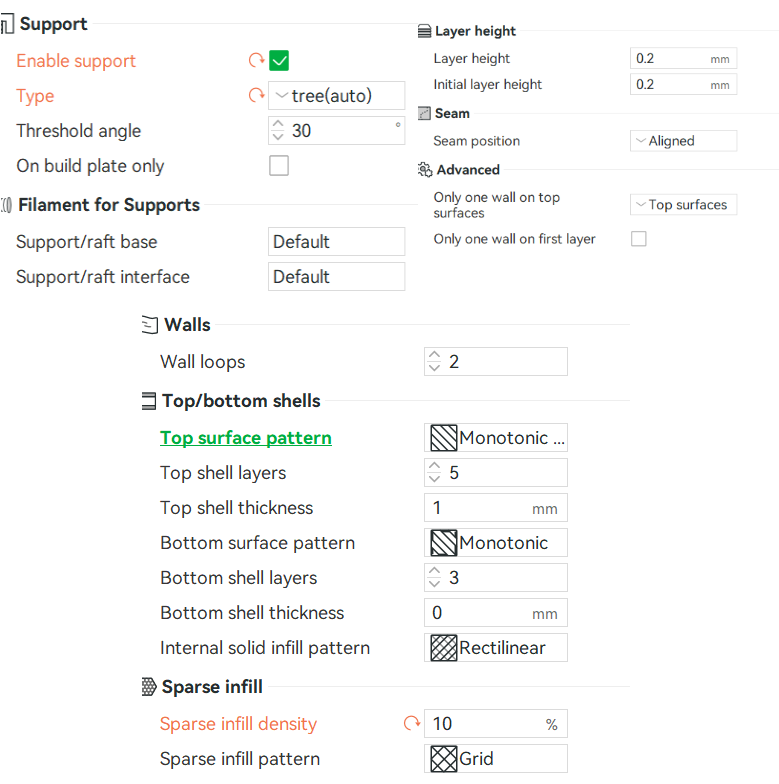
As for the supports and time taken to print, I tried to use as little supports as I could however there were some parts that needed supports these were the barrel and the point between the turret and body. As for the time taken for the print it was about 54mins. Below you can see the time taken and the supports needed.

and I think that is it.
So, as I sign off from this blog for the last time, I want to thank each and every one of you for coming along on this journey. It's been a wild ride full of learning, laughs, and a fair share of 3D printing mishaps. Remember, the world of making is vast and full of possibilities—so keep creating, keep innovating, and most importantly, keep having fun!
Catch you on the flip side! ✌️
Happy making! 🎨🛠️


Comments